

A simple Web API using Claudia.js, AWS and DynamoDB
Abstract
Recently I played around with Claudia.js and AWS Lambda. And I thought that could be a good technical stack for the “Illegal or frowned upon” api. So I gave the Claudia.js API Builder a chance – and it was so easy that I want to quickly write this up here.
Claudia.js
In the first place Claudia.js is a deployment tool for Node.js based projects and eases the use of AWS by abstracting a lot of configuration and deployment steps.
On top of the deployment tools Claudia.js offers an API Builder and a BotBuilder API (which I will cover in another post).
The API Builder allows it to easily build serverless Web APIs using the AWS API Gateway. For the very basic examples please refer to the very good Tutorials and Documentation on the official site.
Hands-On
While writing this post I’ll build the Web API for this example live, I hope that by doing this I will not forget any crucial point. You can find the link to the code at the bottom.
As example I’ll take the statement class from “Illegal or frowned upon”.
export interface Statement {
id: number;
text: string;
illegalVotes: number;
frownedUponVotes: number;
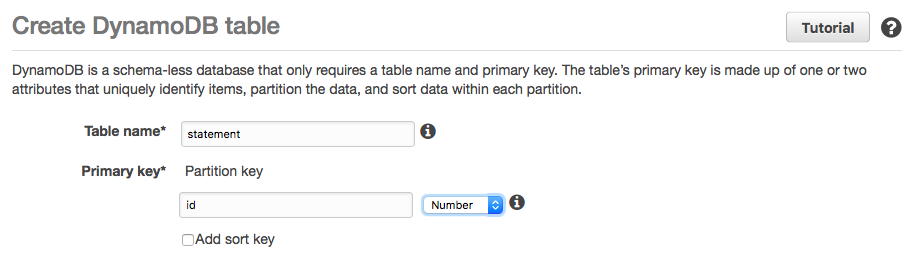
}Step 1 – create the DynamoDB table
Create an DynamoDB Table for the statement as shown in the screenshot.
Step 2 – initialize the project
Create a empty directory. Init a new npm project. Install claudia-api-builder and aws-sdk and save them dependency.
mkdir iofu-aws
npm init
npm install claudia-api-builder -S
npm install aws-sdk -S
To be able to access DynamoDB the service needs special permissions. These can be passed to Claudia.js so that it is applied to our lambda function when deployed.
Create a access-dynamodb.json inside a policy folder.
{
  "Version": "2012-10-17",
  "Statement": [
    {
      "Action": [
        "dynamodb:DeleteItem",
        "dynamodb:GetItem",
        "dynamodb:PutItem",
        "dynamodb:Scan"
      ],
      "Effect": "Allow",
      "Resource": "*"
    }
  ]
}
Step 3 – Implement the API
Create the entry point for the api (app.js). For the moment it will provide the possibility to POST a new statement and store it in the DynamoDB and a GET for all stored statements.
const ApiBuilder = require('claudia-api-builder'),
    AWS = require('aws-sdk');

const table = 'statement';

var api = new ApiBuilder(),
    dynamoDb = new AWS.DynamoDB.DocumentClient();

module.exports = api;

// Create new statement
api.post('/statement', function (request) {
  'use strict';
  console.log(request);
  var params = {
    TableName: table,
    Item: {
      id: Date.now(),
      text: request.body.text,
      illegalVotes: request.body.illegalVotes,
      frownedUponVotes: request.body.frownedUponVotes
    }
  };
  // return dynamo result directly
  return dynamoDb.put(params).promise();
}, { success: 201 }); // Return HTTP status 201 - Created when successful

// GET all statements
api.get('/statement', function (request) {
  return dynamoDb.scan({ TableName: table }).promise()
      .then(response => response.Items)
});
Step 4 – Deploy
Now to the deployment capabilities of Claudia.js come into play. Note: Before this will work you’ll need to perform some general configuration that can be found in the Claudia.js documentation.
claudia create --region us-east-1 --api-module app --policies policyWhat happens when executing the above statement?
Claudia.js will first build the code and create a zip file with all the contents. It then creates the initial lambda function and also the necessary role. And finally uploads/deploys the created zip.
The –region option tells Claudia.js in which region to deploy the function (Thank you, Cpt. Obvious!).
The –api-module defines the main module of our function. As we exported the built api in the app.js file we give it the name of that file.
The –policies option is a directory or file pattern for additional IAM (Identity and Access Management) policies to be included in the role that is created to run the lambda function.
As a result of the create command Claudia.js prints us the configuration (and stores it in a file called claudia.json in the project root directory).
{
  "lambda": {
    "role": "iofu-aws-executor",
    "name": "iofu-aws",
    "region": "us-east-1"
  },
  "api": {
    "id": "2hmzoogb6l",
    "module": "app"
  }
}
Step 5 – test it
Now we can add a test statement using curl from the terminal. And afterwards retrieve all statements with.
curl -H "Content-Type: application/json" -X POST -d @./test/test.json https://2hmzoogb6l.execute-api.us-east-1.amazonaws.com/latest/statementcurl https://2hmzoogb6l.execute-api.us-east-1.amazonaws.com/latest/statementAnd thats it.
Conclusion
I think ClaudiaJS is pretty handy. The abstraction it provides for the AWS stuff is quite nice, especially when starting with the topic. You don’t need to understand everything whats happening under the hood. Also the Api builder is quite easy to use and the examples provided on the website and the different example projects on GitHub are easy to comprehend.
Links
- The complete code can be found on my GitHub repo
- Claudia.js Website
- Claudia.js on GitHub
- AWS Trademark Guidelines
Teaser Photo by rawpixel.com from Pexels